You’re about to invest thousands in custom medals for your event. Before you sign that purchase order, you should know exactly what happens on the factory floor — because the difference between a medal that looks sharp on event day and one that disappoints comes down to process, not price. Understanding custom medal manufacturing isn’t for engineers. It’s how you spot a supplier cutting corners before samples arrive.
What we’ll cover: the complete 12-step manufacturing sequence that turns your design file into finished medals, real process parameters most suppliers won’t volunteer, a practical comparison of die casting versus stamping, and the six questions procurement teams ask us most often.
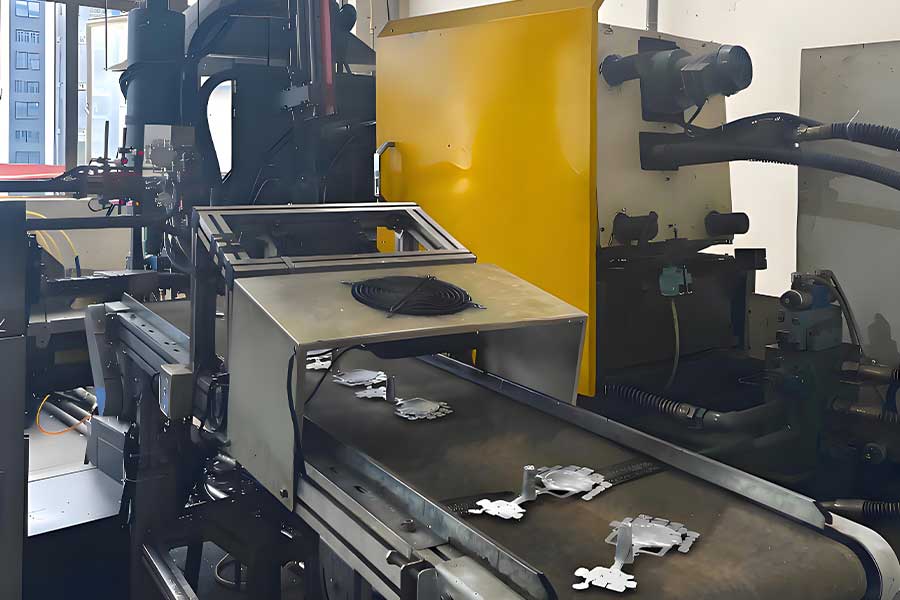
[Image: process-03-die-casting.jpg — Molten zinc alloy being injected into a precision steel mold on an 88-ton die casting machine]
Design & Artwork: The Blueprint That Determines Everything
A medal’s quality is decided before any metal melts. The design file establishes every constraint that follows — what detail the mold can capture, how colors will fill recessed areas, where attachment hardware mounts. Get this stage wrong and no amount of manufacturing skill downstream can fix it.
What a Production-Ready File Actually Needs
You don’t need to be a designer. But your file needs to meet production specs. Here’s what we ask for — and what we fix when files fall short.
| Requirement | Production Standard | What Happens If It’s Wrong |
|---|---|---|
| File Format | AI, CDR, or PSD — vector preferred | Raster images can’t generate CNC toolpaths; we redraw, adding a day |
| Resolution | 300+ DPI at actual medal size | Low-res artwork loses detail during mold engraving — soft edges, fuzzy text |
| Color Spec | Pantone solid coated codes | Screen RGB doesn’t translate to enamel pigments; we rematch, which takes time |
| Metal Line Width | Minimum 0.3mm | Thinner lines collapse during casting — the mold cavity simply doesn’t fill that narrow a channel |
| Text Size | 6pt minimum | Below 6pt, molten metal fills the letter cavities instead of forming readable characters |
| Color Bleed Gap | 0.2mm minimum between adjacent colors | Without a gap, colors bleed across metal borders during filling — blurred edges |
We receive 72 DPI JPEG logos in RGB from well-meaning event coordinators every week. It’s not a problem — we convert them. But it adds a day to the timeline. Vector files go straight to the CNC engraver and save everyone time.
From Screen to Steel
Our mold team uses Beijing Jingdiao CNC systems to carve the design into H13 tool steel. The 3D relief data — every contour, every letter, every portrait detail — is translated into toolpaths with ±0.02mm precision. A complete mold takes 3-5 days depending on complexity, then undergoes heat treatment to HRC 48-52. That hardness is what lets a single mold produce 50,000+ identical medals without softening.
[Image: process-02-mould-engraving.jpg — CNC engraving machine cutting a medal mold cavity into tool steel]
Mold Making: The Investment That Determines Every Medal’s Sharpness
You pay for the mold once. Your medal’s detail sharpness depends on it for every single piece that follows. This is the line item first-time buyers question most — and the one where cutting corners produces the most visible result.
Steel Molds vs. Rubber Molds
For orders over 100 pieces, insist on steel. Here’s what the cost difference actually buys you.
| Steel Mold (H13 Tool Steel) | Rubber Mold (Silicone) | |
|---|---|---|
| Lifespan | 50,000+ shots before refurbishment | 500-1,000 shots before detail degrades |
| Precision | ±0.02mm across the entire cavity surface | ±0.1mm — visible softening after 200 shots |
| Surface Finish | Mirror polish achievable — reduces downstream polishing time | Matte texture transfers to casting — requires extra buffing |
| Tooling Cost | $500-$1,500 one-time | $100-$300 |
| Cycle Time | 15-30 seconds per shot | 60-90 seconds — manual pour, slower cooling |
| Right For | Events ordering 100+ medals, any design with fine detail, repeat annual orders | Prototypes, ultra-small runs under 50 pieces, simple shapes |
A quality mold has six components working together: the mold frame, cavity inserts (the actual medal shape), support pillars, slider mechanisms for undercuts, ejector pins to release the casting, and the gate where metal enters. Each cavity insert gets heat-treated — without this step, the 385°C zinc alloy would gradually erode the mold surface, and your 500th medal wouldn’t look like your first.
One detail experienced mold makers obsess over: gate placement. For round medals, four gates spaced evenly around the perimeter. This ensures the molten metal fills the cavity symmetrically. Uneven gating produces flow lines — faint streaks visible through plating that no polishing can fully remove.
Die Casting: Where 385°C Zinc Alloy Meets 88 Tons of Pressure
This is the loudest, hottest part of the factory. And it’s where the gap between a specialist medal manufacturer and a general metal shop becomes obvious — usually within the first three shots.
The Hot Chamber Casting Cycle
Zinc alloy ingots — Zamak 3, 5, or 7 — melt in a furnace built into the machine at 385°C. A plunger forces the liquid metal through a gooseneck into the clamped mold under pressure. The metal fills every recess — letter grooves, portrait contours, intricate filigree — in under one second. Fifteen to thirty seconds later, the mold opens and ejector pins push out a finished casting.
That casting is still attached to its “tree” — the sprue, runners, and gates that delivered metal into the cavity. These get trimmed at the deburring station immediately after.
Zinc alloy dominates custom medals for a reason. Density of 6.7 g/cm³ — lighter than brass (8.9) but heavier than aluminum (2.7), giving medals satisfying weight without shipping-cost penalties. At 385°C, the alloy’s fluidity is exceptional, filling details that stamping can’t touch. It takes plating beautifully. And it costs roughly half what brass does.
Casting Defects and How We Prevent Them
| Defect | What You’d See | Root Cause | Our Prevention |
|---|---|---|---|
| Cold Shuts | A visible seam where two metal fronts met but didn’t fuse | Mold too cold; injection too slow | Preheat mold to 150°C; maintain consistent cycle rhythm |
| Porosity | Tiny pits visible after polishing — like pinpricks | Trapped air; poor mold venting | Vent channels in parting line; vacuum assist on complex designs |
| Short Shot | Missing detail — a letter or feature that didn’t fill | Injection pressure too low; gate undersized | Gate diameter ≥2mm; pressure calibrated per design complexity |
| Ejection Cracks | Hairline fractures near ejector pin locations | Uneven pin distribution; part too hot at ejection | Minimum 4 pins evenly spaced; cooling time ≥8 seconds |
| Flash | Thin metal fin around the medal edge | Clamping force insufficient; mold surfaces worn | 88-ton clamping on all machines; mold resurfacing every 5,000 shots |
A factory that’s been casting medals for 15 years knows the sweet spot for each mold — the right injection temperature, the right cycle time, when to pause and clean the cavity. This isn’t in a manual. It’s muscle memory on the shop floor.
[Image: factory-workshop-03.jpg — Die casting machine operator monitoring the injection cycle]
Polishing: The Step That Makes or Breaks the Plating
Raw castings come out dull gray, with gate marks, parting lines, and surface texture from the mold cavity. Polishing transforms them into the smooth, reflective surface that plating will amplify.
The Two-Stage Polish
Stage 1 — Wet grinding: Each casting is held against a rotating abrasive wheel under water cooling. Water prevents the zinc alloy from overheating, which would soften the surface and create micro-smearing that shows through plating as cloudy patches. This stage removes gate marks and parting line flash — about 30-60 seconds per side.
Stage 2 — Buffing: A cloth wheel with polishing compound brings the surface to a mirror finish. For matte textures, this stage substitutes a wire wheel or abrasive belt. The surface standard here is unforgiving: electroplating doesn’t hide defects, it magnifies them. A scratch invisible on bare zinc becomes unmistakable under bright nickel.
Our post-polish QC checkpoint: every medal surface inspected under angled 5000K light at arm’s length. Anything visible goes back for rework.
[Image: process-05-polishing.jpg — Technician polishing medal castings on a water-cooled grinding wheel]
Electroplating: Gold, Silver, and the Chemistry That Makes Them Last
Electroplating isn’t one tank. It’s a sequenced chemical process where each bath serves a specific purpose. Skip a step and your gold finish peels within six months.
The Plating Sequence
1. Ultrasonic degreasing — Removes polishing compound residue and fingerprints. Any surface contamination creates adhesion failure — the blistering pattern you see on cheap costume jewelry. This is where rushed factories cut corners, and where the evidence shows up months later on your medal.
2. Alkaline copper strike (~500 seconds) — A thin copper layer deposited from an alkaline bath. This is the adhesion layer, bonding to the zinc alloy substrate and creating a uniform conductive surface for subsequent layers. Think of it as primer before paint. Without it, finish layers have nothing to grip.
3. Acid copper build (20-60 minutes) — A thicker copper layer from an acid bath fills microscopic surface irregularities. Longer in this bath = smoother foundation = better final finish. But it costs more, so budget manufacturers run it short.
4. Color plating — The visible finish. Gold (24K or alloyed), nickel (bright or matte), rose gold, chrome, black nickel. Electric current drives metal ions from the bath onto the medal surface. Color consistency batch-to-batch is the mark of a disciplined plating line.
5. Anti-tarnish seal — Clear lacquer spray baked at 100°C for 40 minutes in a tunnel oven. Gold and copper finishes oxidize on contact with air without this seal. It’s invisible but essential.
Plating Options at a Glance
| Finish | Look | Durability | Cost Factor | Best Application |
|---|---|---|---|---|
| Bright Gold | Mirror-reflective warm gold | Good — with seal | Baseline | Traditional awards, academic, military |
| Antique Gold | Dark recesses, burnished highlights | Excellent — oxidation enhances the look | +$0.10/piece | Heritage events, vintage-themed races |
| Bright Nickel | Cool silver-white, high reflectivity | Excellent — nickel is inherently corrosion-resistant | Baseline | Modern corporate, tech-industry events |
| Antique Silver | Dark gray recesses, bright silver highlights | Excellent | +$0.10/piece | Winter events, industrial-themed awards |
| Rose Gold | Warm pink-copper tone | Good | +$0.15/piece | Women’s events, breast cancer awareness |
| Black Nickel | Deep charcoal to matte black | Excellent | +$0.15/piece | Tactical/military, minimalist modern |
| Dual-Tone | Two finishes on one medal | Varies | +$0.20-0.30/piece | Detailed designs needing visual contrast |
| Rainbow PVD | Iridescent color-shift in light | Excellent — physical vapor deposition | +$0.50+/piece | Premium commemoratives, collector’s editions |
Antique finishes deserve special mention. Unlike bright plating where surface prep carries the result, antique finishes use deliberate chemical darkening — a sulfide solution darkens the recessed areas, then raised surfaces get lightly buffed to reveal bright metal. This creates depth that makes design details pop. For medals with intricate relief, antique finishes almost always look better than bright equivalents.
[Image: process-07-plating.jpg — Racks of medals moving through electroplating baths]
Color Filling: Soft Enamel, Hard Enamel, and How to Choose
The recessed areas in your design are where color lives. This isn’t just about aesthetics — enamel type affects cost, production timeline, durability, and how the medal feels in someone’s hand.
Enamel Types Head-to-Head
| Soft Enamel | Imitation Hard Enamel | Translucent Enamel | Glitter | |
|---|---|---|---|---|
| Surface Feel | Textured — you feel the metal borders | Smooth and flat — color flush with metal | Smooth, glass-like with see-through color | Textured with embedded sparkle |
| Process Flow | Plate first → fill color → dry | Fill color → dry → polish flat → plate | Plate first → fill with transparent pigment → dry | Sprinkle glitter onto wet enamel → dry → optional epoxy cap |
| Minimum Recess Width | 0.3mm | 0.5mm | 0.5mm | 0.3mm |
| Relative Cost | Baseline | +20-30% | +15-20% | +10-15% |
| Durability | Color sits below metal borders — well protected | Colors flush with surface — more exposed to wear | Similar to soft enamel | Depends on epoxy cap quality |
| Design Fit | Sports events, race medals, school awards — about 80% of all orders | Corporate awards, commemoratives, anything needing a premium, jewelry-like feel | Water themes, layered visual effects, “stained glass” aesthetic | Kids events, party themes, fun runs |
The Drying Cycle Most Buyers Never Think About
Color filling looks simple — someone with a syringe injects enamel into recessed areas. The skill lies in the drying, and this is where corners get cut.
- Low-temperature phase: 60-70°C for 60-90 minutes — Partial cure. Solid enough to handle but not fully cross-linked. This lets us apply multiple colors in sequence: each color gets its own low-temp cycle, and colors don’t bleed into each other.
- High-temperature phase: 100°C for 60 minutes — Full cure. The enamel cross-links completely into a chemically resistant, mechanically stable solid.
Rushed drying produces enamel that scratches off with a fingernail. That’s why some samples look great in photos but degrade within weeks. We cure completely — every batch, every color, every time.
Pantone Matching Reality
We mix enamel from ten base pigments to match Pantone standards. About 85% of the solid coated range is reproducible. Metallic Pantones and extreme fluorescents have limits — we’ll tell you upfront if a color can’t be matched. For brand-critical colors, we produce a color-match sample before committing to full production.
[Image: process-09-color-filling.jpg — Enamel being dispensed into recessed medal areas by hand]
Die Casting vs. Stamping: Which Process for Your Medals?
Not every medal needs die casting. For simple designs at volume, stamping produces excellent results at lower cost. But the two processes produce fundamentally different products.
Process Comparison
| Die Casting (Zinc Alloy) | Stamping (Brass/Iron/Copper) | |
|---|---|---|
| How It Works | Molten metal injected into a mold under pressure | Solid metal blank pressed between engraved steel dies |
| 3D Capability | Full multi-level 3D relief, undercuts, complex geometry | 2D relief only — flat or single-level raised detail |
| Detail Sharpness | Excellent — replicates mold to ±0.02mm | Good — but softens as dies wear past ~5,000 strikes |
| Edge Quality | Sharp, any shape including cutouts and irregular outlines | Smooth, primarily round or rectangular |
| Weight | Lighter — zinc density 6.7 g/cm³ | Heavier — brass 8.9, iron 7.8 g/cm³ |
| Thickness Range | 2mm minimum | 1.2mm brass / 2mm iron minimum |
| Ideal Volume | 100-50,000+ pieces | 50-5,000 pieces |
| Tooling Cost | $500-$1,500 (steel mold) | $300-$800 (steel dies) |
| Unit Cost at 500 pcs | $1.50-$3.00 | $1.00-$2.50 |
The practical rule: if your event logo has detail you’re proud of — go die cast. If your design is mostly text with a simple border or emblem, stamping will do the job. For a running club’s annual 5K with a simple logo, stamped is fine. For a marathon’s 10th anniversary medal featuring the city skyline in multi-level relief, that’s die casting territory.
Assembly, QC, and the Final Impression
A beautiful medal on a cheap ribbon creates a cheap impression. Assembly is where upstream quality either gets showcased or undermined.
Ribbon Assembly
Standard adult race ribbon: 860-900mm long × 20-30mm wide, heat-transfer printed with event branding. Attachment hardware (split ring, dog clip, swivel clasp) is color-matched to the medal’s plating. Color-mismatched hardware is the fastest giveaway of a rushed production run. We ultrasonic-weld ribbon loops — no stitches to fray, no glue to fail under tension.
For custom medal ribbons with complex branding, woven options with sublimated logos provide higher durability than printed alternatives.
Three-Stage QC
Every medal passes through three inspection gates:
- Post-casting: Check for fill defects — cold shuts, short shots, porosity. Rejects go back into the furnace. Zinc alloy is 100% recyclable.
- Post-plating: 5000K LED inspection for plating uniformity, color consistency, adhesion. XRF thickness verification on sample basis.
- Final pre-packing: Every medal individually checked. Color fill completeness. Ribbon attachment pull-tested to 5kg (industry standard is 3kg). Laser engraving verified against order manifest.
Complex multi-color medals run about 0.3-0.5% rejection — typically minor color-fill issues caught and reworked at stage 3.
Learn More About Medal Quality
If you’re comparing suppliers, our medal materials guide breaks down the five material options with objective trade-offs. For larger orders, bulk custom medals explains how volume pricing and production scheduling work at scale.
Frequently Asked Questions
How long does the full process take — design to delivery?
Design: 1-2 days. Mold making: 3-5 days. Sample production: 7-10 days. Bulk production: 7-15 days after sample approval. Express shipping: 3-7 days. Total: typically 4-5 weeks. Rush service compresses this to 2-3 weeks for a 20-30% surcharge. The biggest variable is mold complexity — a simple round medal mold takes 3 days; an intricate 3D design with cutouts can take 7+.
What material should I choose for an outdoor or coastal event?
Zinc alloy with nickel plating and epoxy coating. Nickel is inherently corrosion-resistant and the epoxy cap seals the color fill against moisture. For marine environments — coastal races, sailing events — stainless steel with laser engraving (no color fill to degrade) is the most durable choice, though more expensive.
How do I know if my design will translate well to a medal?
Send it to us. We’ll return a 3D rendering within 24 hours showing exactly how your design works as a die-cast medal — what details read well, what might need adjustment, how plating and colors interact. This is free. It’s also the step where most clients realize their logo needs simplification — what works on screen doesn’t always work in metal relief.
What’s the actual cost difference between soft and hard enamel?
Hard enamel costs 20-30% more. The extra cost is the polishing — after color filling, each medal gets polished flat to bring enamel level with the metal surface. This is labor-intensive and can’t be automated. For orders under 200 pieces, the cost difference is more pronounced because setup time amortizes across fewer units.
Can I change my ribbon or packaging choice after production starts?
Ribbon — yes, up until the assembly stage. Packaging — yes, any time before packing. Medal design and plating — no. Once the mold is cut and plating baths are set up, changes restart the timeline. This is why the design approval stage is the most important decision point in the entire process.
Do you store molds for reorders?
Yes. We maintain molds in climate-controlled storage and can pull them for reorders within 24 hours. This eliminates the mold-making timeline and cost from repeat orders. We recommend storing molds if you run annual events — the storage cost is negligible compared to re-cutting.
Related Medal Manufacturing Guides
- Zinc Alloy vs Brass Medals: Which Material Fits Your Event? — Material selection deep-dive for procurement decisions
- Soft Enamel vs Hard Enamel: A Manufacturer’s Comparison — Technical enamel guide with durability testing data
- Custom Race Medals: The Complete Event Director’s Guide — From design brief to race-day delivery
Have an event coming up? Send your event date, quantity, size, and logo to badgeartisans@gmail.com. We’ll return a design direction, production timeline, and quote within 24 hours — free.